How To Check and Transfer FSMO Roles
In this guide, we will go through how to Check and transfer FSMO roles to another domain controller as your AD infrastructure evolves. We’ll also show you what to do if things go wrong with seizing role owners.
Rather than delving into complex technical intricacies that might make your head spin, this guide will take you on a simple step-by-step guide. Whether you’re a seasoned system administrator, an IT enthusiast, or someone who has found themselves in charge of Active Directory management, this guide offers a solid foundation for confidently handling Flexible Single Master Operations.
Understanding FSMO Roles and Its Functionality In Active Directory
FSMO form the backbone of Active Directory functionality. These roles are akin to directors in a play, ensuring smooth coordination and execution of vital tasks. They manage crucial operations such as schema updates, domain naming, RID allocation, infrastructure maintenance, and PDC emulation. There are five FSMO roles:
1. RID Master
The RID master is responsible for managing the allocation of unique Relative IDs (RIDs) within a domain. When a domain controller (DC) needs to create a new security principal object like a user or group, it assigns a SID (Security ID) to that object. The SID consists of a domain SID (common to all objects in the domain) and a RID, which must be unique within the domain.
Each DC in the domain is allocated a pool of RIDs that it can use to create SIDs. When a DC’s pool runs low, it requests additional RIDs from the RID master. The RID master ensures that the assigned RIDs are unique and maintains an inventory of unallocated RIDs for distribution. In essence, it safeguards the uniqueness of security IDs within the domain by regulating the distribution of RIDs to domain controllers.
2. PDC Emulator
The PDC Emulator, short for Primary Domain Controller Emulator, plays a crucial role in managing time synchronization and maintaining essential functions within a Windows Active Directory domain. Its primary responsibility is to ensure that all computers within the domain share a common and accurate time, a critical requirement for secure authentication using the Kerberos protocol.
In addition to its timekeeping role, the PDC Emulator serves as an authoritative figure within its domain, handling important functions like processing password changes initiated by other domain controllers, forwarding authentication failures for incorrect passwords, managing account lockout policies, and handling compatibility with older Windows NT 4.0 systems.
3. Infrastructure Master
The Infrastructure Master plays a crucial role in maintaining cross-domain object references. Imagine you have a network with multiple domains, and objects in one domain need to reference objects in another domain, like users or groups. These references are established using unique identifiers like GUID, SID (for security-related references), and the object’s distinguished name (DN).
The Infrastructure Master is like the librarian responsible for keeping these references up to date. It ensures that when objects in one domain are moved, renamed, or deleted, the references in other domains are also updated accordingly.
4. Schema Master
The Schema Master plays a vital role in managing the directory’s structure. It is responsible for making changes to the directory’s schema, which defines the blueprint for how objects like users, groups, and computers are organized and described within the directory.
This role ensures that any modifications or extensions to the schema are controlled and consistent across the entire forest. Only the schema master can process these schema updates, ensuring data integrity and preventing conflicts.
5. Domain Naming Master
The Domain Naming Master role is like the chief organizer of your Active Directory. Its main job is to control and manage the names and boundaries of domains in your Active Directory forest. It’s the only one that can add or remove entire domains from your directory. It also handles connections to domains in other directories, making sure everything works smoothly in your network.
Check AD FSMO Roles Using PowerShell, Command Line and GUI
There are several methods to accomplish this task, each catering to different preferences and needs. This section will delve into three distinct approaches for checking FSMO holders: using PowerShell, utilizing the NetDom query tool, and employing the graphical user interface (GUI).
Using PowerShell to Check FSMO Roles
Launch PowerShell with administrative privileges on a machine that has Remote Server Administration Tools (RSAT tools) installed
# PowerShell cmdlets to view all FSMO Roles
# Query the Schema Master role
Get-ADForest | Select-Object SchemaMaster
#
# Query the Domain Naming Master role
Get-ADForest | Select-Object DomainNamingMaster
#
# Query the RID Master role
Get-ADDomain | Select-Object RIDMaster
#
# Query the PDC Emulator role
Get-ADDomain | Select-Object PDCEmulator
#
# Query the Infrastructure Master role
Get-ADDomain | Select-Object InfrastructureMaster
#
Query FSMO Role Holders Using Netdom
In addition to using PowerShell, the Netdom query tool can also be utilized to check the FSMO roles in the Active Directory environment. Here’s how you can use the Netdom query tool to accomplish this:
Launch the Command Prompt with administrative privileges to ensure you have the necessary permissions to use Netdom.
:: Query all FSMO roles
netdom query fsmo

:: Query Individual FSMO roles
netdom query fsmo | find "Schema Master"
netdom query fsmo | find "Domain Naming Master"
netdom query fsmo | find "RID Master"
netdom query fsmo | find "PDC Emulator"
netdom query fsmo | find "Infrastructure Master"
Using GUI to Check FSMO Roles
In an Active Directory environment, you can also check the FSMO roles using the graphical user interface (GUI) provided by the Active Directory snap-in. Follow the below steps to determine the role holder:
Checking Domain Level FSMO Roles using GUI
To query domain-level FSMO roles – PDC Emulator, Infrastructure and RID Master, follow the steps listed below.
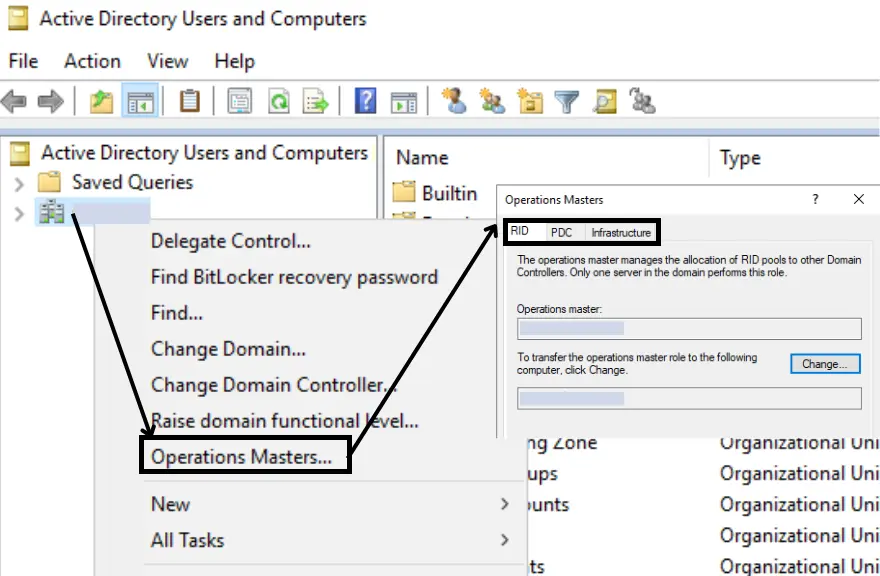
- Launch “Active Directory Users and Computers” mmc
- Right-click on your Domain Name > Select Operations Master
- All the domain-level FSMO roles are displayed in tabs.
Checking Forest Level FSMO roles using GUI
To check the Forest Level FSMO roles, you will need to use the “Active Directory Domain and Trust” MMC snap-in to query the Domain Naming role, and the “AD Schema” MMC snap-in to query the Schema Master role. Below, we have provided detailed, step-by-step instructions for both procedures.
To query the forest-level FSMO role – The Domain Naming Master, follow the steps listed below
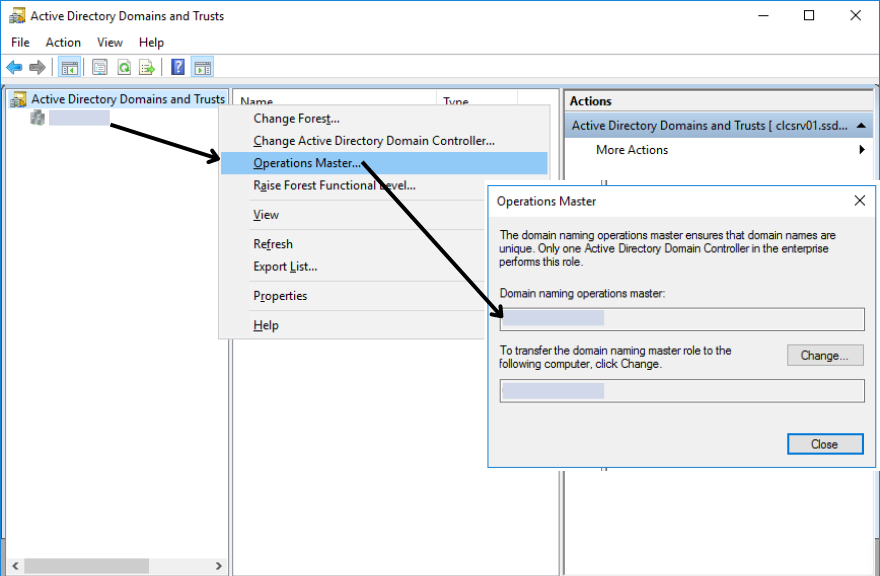
- Launch Active Directory Domain and Trust console
- Right click on Active Directory Domain and Trust > Select Operations Master
- Domain Controller hosting Domain Naming FSMO role is displayed.
To query the forest-level FSMO role – The Schema Master, follow the steps listed below
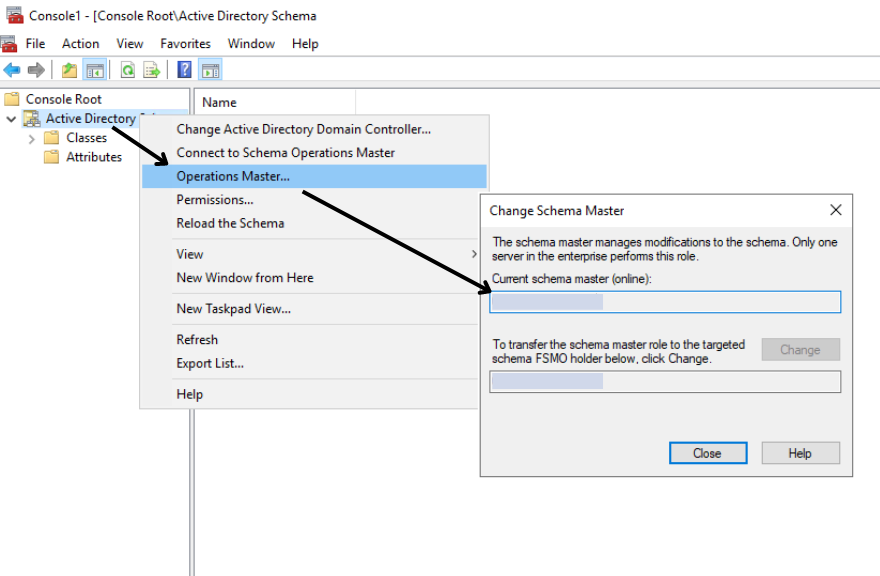
- To view the current schema master: At an administrator command prompt, type regsvr32 schmmgmt.dll
- Add Active Directory Schema MMC Snap-In
- Right Click on the Active Directory Schema > Select Operations Master
- Domain controller hosting Schema Master role is displayed.
Learn How To Transfer FSMO Roles With PowerShell, Command Line and GUI
In this section, we will explore the step-by-step process of transferring the roles from one active directory domain controller to another DC. The same process can be used if you want to transfer roles to or from Microsoft Windows Server 2016 / Windows Server 2019 or Windows Server 2022
To transfer the Active Directory FSMO role the administrator must have the following privilege role assigned:
| FSMO Role | Privileged Role Required |
| Schema | Schema Admins |
| Domain Naming | Enterprise Admins |
| RID | Domain Admins |
| PDC Emulator | |
| Infrastructure |
Transfer FSMO roles with PowerShell
Launch PowerShell with administrative privileges on a machine that has RSAT tools installed
# PowerShell cmdlet to transfer all FSMO roles
Move-ADDirectoryServerOperationMasterRole –Identity "Target_DC_Name" –OperationMasterRole PDCEmulator, RIDMaster, InfrastructureMaster, SchemaMaster, DomainNamingMaster
#
# Alternate PowerShell cmdlet
# Instead of using FSMO Role Name, a number refrencing role can also be used
Move-ADDirectoryServerOperationMasterRole –Identity "Target_DC_Name" –OperationMasterRole 0,1,2,3,4
# PDCEmulator = 0
# RIDMaster = 1
# InfrastructureMaster = 2
# SchemaMaster = 3
# DomainNamingMaster or 4
#
Move FSMO role via NetDom
In addition to using PowerShell, the Netdom query tool can also be utilized to move the FSMO roles within your Active Directory environment. Here’s how you can use the Netdom query tool to accomplish this:
- Access Ntdsutil: On any domain controller, launch the Command Prompt with administrative privileges to ensure you have the necessary permissions to perform the role transfer. type in “Ntdsutil” and hit “Enter” to proceed.
- Navigating to FSMO Roles: Type in “roles” at the ntdsutil: prompt and press “ENTER” to access the FSMO maintenance options.
- Establishing Server Connections: Continue by typing “connections” and pressing “ENTER” to access the server connections menu.
- Connect to the Desired Server: To connect to the server of your choice, input “connect to server <servername>”, replacing <servername> with the actual server name. Press “ENTER.”
- Exit Connections Menu: Once connected, type “q” and press “ENTER” again to exit the server connections menu.
- Transferring FSMO Roles: Return to the FSMO maintenance: prompt and type “transfer <role>”, where <role> is the specific role you intend to transfer. For instance, to transfer the RID Master role, input “transfer RID master”.
Use the below to transfer the specified FSMO role to the connected server
Transfer domain naming master
Transfer infrastructure master
Transfer PDC
Transfer RID master
Transfer schema master
Transfer FSMO Role Using GUI
The process of transferring FSMO roles can be seamlessly accomplished through the graphical user interface (GUI) snap-in available within the Active Directory. To execute the transfer for each specific role, simply adhere to the subsequent steps aimed at identifying the current role holder for a smooth transition process.
Move Domain Level FSMO Roles using GUI
To transfer domain-level FSMO roles – RID, PDC and Infrastructure, follow the steps listed below.
- Launch “Active Directory Users and Computers” mmc
- Right-click active directory Domain Name > Select Operations Master
- All the 3 domain-level FSMO roles are displayed in tabs.
- Select each tab. You will see the current FSMO role holder and a button labelled “Change”
- Click the ‘Change’ button under each tab, then pick the new DC to carry out the transfer of that specific FSMO role.
Move Forest Level FSMO roles using GUI
To transfer Forest Level FSMO roles, you will need to use the “Active Directory Domain and Trust” MMC snap-in to move the Domain Naming FSMO role, and the “AD Schema” MMC snap-in to transfer the Schema Master role. Below, we have provided detailed, step-by-step instructions for both procedures.
To transfer the forest-level FSMO Role – The Domain Naming Master, follow the steps listed below
- Launch “Active Directory Domain and Trust” mmc
- Right Click on Active Directory Domain and Trust > Select Operations Master
- Domain Controller hosting Domain Naming FSMO role is displayed and a button labelled “Change”
- Click the ‘Change’ button and pick the new DC to perform the transfer of the Domain naming master FSMO role.
To transfer the forest-level FSMO Role – The Schema Master, follow the steps listed below
- Add “Active Directory Schema” Snap-in on MMC
- Right Click on the Active Directory Schema > Select Operations Master
- The domain controller holding the Schema Master role is displayed. and a button labelled “Change”
- Click the ‘Change’ button and pick the new DC to perform schema master FSMO role transfer.
Seize and Transfer the FSMO Roles When Domain Controller Becomes Permanently Unavailable
When it comes to managing Flexible Single Master Operations roles within an Active Directory environment, the preferred method is to perform role transfers. This ensures a smooth transition, where the role is cleanly removed from the old Domain Controller (DC) and securely transferred to the new DC. However, real-world scenarios can be unpredictable.
In cases where a DC becomes permanently unavailable due to failure or other reasons, the need to take decisive action arises. This is where seizing FSMO roles becomes essential. Seizing involves the process of forcefully transferring roles from a failed or offline DC to a functional one.
One of the easiest ways to seize FSMO roles is by utilizing the PowerShell command for transferring roles (Move-ADDirectoryServerOperationMasterRole) with the -Force flag. This effectively forces the role to be seized without requiring the formal transfer process.
# PowerShell cmdlet to seize a specific FSMO role
#
Move-ADDirectoryServerOperationMasterRole –Identity "Target_DC_Name" –OperationMasterRole <FSMO Role to Seize> -Force
#
# Replace <FSMO Role to Seize> with one or all of listed FSMO role to seize
# PDCEmulator, RIDMaster, InfrastructureMaster, SchemaMaster, DomainNamingMaster
#
Conclusion: Mastering FSMO Roles, from Viewing and Transferring to Seizing
In conclusion, this guide has laid the foundation for your journey towards FSMO expertise. Stay tuned for more Active Directory insights and keep honing your skills – you’re on your way to becoming an FSMO pro!