
How To Configure DFS Replication And Setup DFS Share
DFS Replication on Windows Server is a robust solution for synchronizing data across multiple servers, ensuring high availability, and optimizing network performance. This article is a treasure trove of insights for IT professionals looking to configure DFS Replication on Windows Server 2019 or 2022. We’ll delve into the intricacies of how to configure DFS namespaces, DFS replication, set DFS shares, and the steps to set up a DFS environment that stands the test of time and scale.
Understanding DFS in Windows Server
The Distributed File System (DFS) is a set of client and server services that allow an organization using Microsoft Windows servers to organize many distributed SMB file shares into a hierarchical namespace. This system provides a tree-like structure that logically represents file data sources across the network.
At its core, DFS offers two key components: DFS Namespaces and DFS Replication. DFS Namespaces enables the creation of a single namespace that aggregates various shared folders from different servers. DFS Replication, on the other hand, synchronizes folder content across multiple servers to ensure copies of the data are consistent and up-to-date.
Benefits of using DFS Replication and DFS Share
The implementation of DFS Replication and DFS Share brings forth numerous advantages:
- Centralized Management: Administrators can manage and structure shared folders scattered across the network from a single interface, reducing complexity and improving efficiency.
- Enhanced Accessibility: Users can access and share files as if they were located on a local drive, regardless of where the data is physically stored, which is transparent to the end-user.
- Network Optimization: DFS Replication minimizes network traffic by replicating only the changes in data, thanks to the Remote Differential Compression technology.
- Improved Data Availability: By replicating data across multiple servers, DFS ensures high availability, making it resilient to server failures.
- Disaster Recovery: DFS Replication can be part of a disaster recovery strategy, as it allows data to be stored in multiple locations, safeguarding against site-specific catastrophes.
- Load Balancing: DFS uses the nearest server concept, which can reduce the load on any single server and optimize response times for end-users.
DFS Key Terms and Concepts
- Namespace: A virtual view of shared folders in the network that appears to users as one consolidated folder structure.
- Replication Group: A set of servers, known as replication group members, that participate in the replication of one or more shared folders.
- DFS Link: A shortcut within a DFS namespace that points to one or more shared folders on the network.
- Namespace Server: A server that hosts a DFS namespace and maintains information about the namespace’s structure and the shared folders’ location within it.
- Folder Target: The shared folder in a DFS namespace to which a DFS link points.
- DFS Topology: The layout that defines how folders are replicated between servers, which can be a hub-and-spoke, full mesh, or custom topology.
- Remote Differential Compression (RDC): A compression algorithm that detects changes to data and enables DFS Replication to replicate only the changed file blocks instead of the entire file.
Prerequisites for Configuring DFS Replication
Before diving into the configuration of DFS, it’s crucial to ensure that your system meets all necessary prerequisites and that you’ve performed all compatibility checks. This preparation is the foundation upon which a reliable and effective DFS setup is built.
System Requirements and Compatibility Checks
To implement DFS, you need to have a network environment running Windows Server. Here are the specific system requirements and compatibility considerations:
- Operating System: DFS is supported on Windows Server 2008 and later versions. For the latest features and best performance, use the most recent version of Windows Server.
- File System: The volumes that host DFS replicated folders must be formatted with the NTFS file system to maintain file and folder permissions.
- Server Hardware: Ensure that the server hardware is capable of handling the expected load. This includes adequate RAM, CPU, and network bandwidth to support the replication process without degrading performance.
- Network Infrastructure: A reliable network infrastructure is required to support DFS, with sufficient bandwidth to handle peak loads and the ability to connect to all replication partners.
Necessary Roles and Features for DFS
Certain roles and features must be installed on your Windows Server to use DFS. These include:
- DFS Namespaces: This role service enables you to group shared folders located on different servers and present them to users as a single namespace.
- DFS Replication: This role service is used to replicate data across multiple servers efficiently.
- File Services: The broader role that includes DFS, which must be installed and configured before setting up DFS.
Active Directory Considerations
DFS relies on Active Directory Domain Services (AD DS) for configuration and replication. Here are some Active Directory considerations:
- Domain Membership: All servers participating in DFS Replication must be members of the same Active Directory domain or trusted domains.
- Site Configuration: Active Directory sites should be properly set up to match the physical network topology, as DFS use site information to optimize replication traffic.
- Permissions: The account used to set up DFS on Windows must have appropriate permissions in Active Directory, including the ability to create and manage AD DS objects related to DFS.
- Schema Version: Ensure that the Active Directory schema version supports DFS. For instance, if you’re using features specific to Windows Server 2016 or 2019, the schema must include these versions.
Installing DFS Namespaces and DFS Replication Roles
Installing DFS roles is a straightforward process, it can be installed utilizing the user-friendly Server Manager with its graphical interface or using PowerShell.
Installing DFS Roles Using Server Manager
This section involves using Server Manager to add necessary roles and features. Here’s how to do it:
Adding DFS Namespaces and DFS Replication Roles
- Launch the Add Roles and Features Wizard: From the Server Manager dashboard, click on “Add roles and features” to start the wizard.
- Installation Type: Select “Role-based or feature-based installation” and click “Next.”
- Select Destination Server: Choose the server you want to install DFS roles from the server pool and click “Next.”
- Select Server Roles: In the list of roles, find and expand the “File and Storage Services” section. Then, expand “File and iSCSI Services.”
- Choose DFS Roles: Select “DFS Namespaces” and “DFS Replication.” You may receive a prompt to add features that are required for DFS; accept these prompts to proceed.
- Additional Features: The wizard may suggest additional features necessary for DFS. Review these and add any that are appropriate for your setup.
- Confirmation: Review your selections on the confirmation page. You can also choose to restart the server automatically if needed after the installation. It’s recommended to check this option to ensure a complete setup.
- Install: Click “Install” to begin the installation process. The wizard will display the installation progress.
Installing DFS Roles Using PowerShell
To use PowerShell to install DFS Replication and the DFSR RSAT management tools, use the following cmdlet:
#
# PowerShell CmdLet to install DFS Namespace and DFS Replicaiton Roles
#
Install-WindowsFeature "FS-DFS-Namespace","FS-DFS-Replication","RSAT-DFS-Mgmt-Con"
#
Creating a DFS Namespace
Creating a DFS Namespace is a strategic process that involves careful planning and execution. A well-thought-out namespace serves as the framework for your organization’s file storage and access strategy. Here’s how to create a DFS Namespace effectively.
Planning Namespace Structure
Before you jump into configuring DFS, it’s vital to plan your namespace structure. Consider the following:
- Assess Current and Future Needs: Understand the current file storage needs and anticipate future growth. This will help determine the number and type of namespaces required.
- Design the Namespace Hierarchy: Decide on a hierarchy that reflects your organization’s structure or workflow. A logical and intuitive structure makes it easier for users to find the files they need.
- Choose a Namespace Type: Decide between a domain-based namespace and a stand-alone namespace. Domain-based namespaces offer greater scalability and are stored within Active Directory, allowing for easier management and redundancy.
- Naming Conventions: Establish clear naming conventions for namespaces and folder targets to maintain consistency and avoid confusion.
Steps To Create a Domain-Based DFS Namespace
Once you have a plan in place, follow these steps to create a domain-based DFS Namespace:
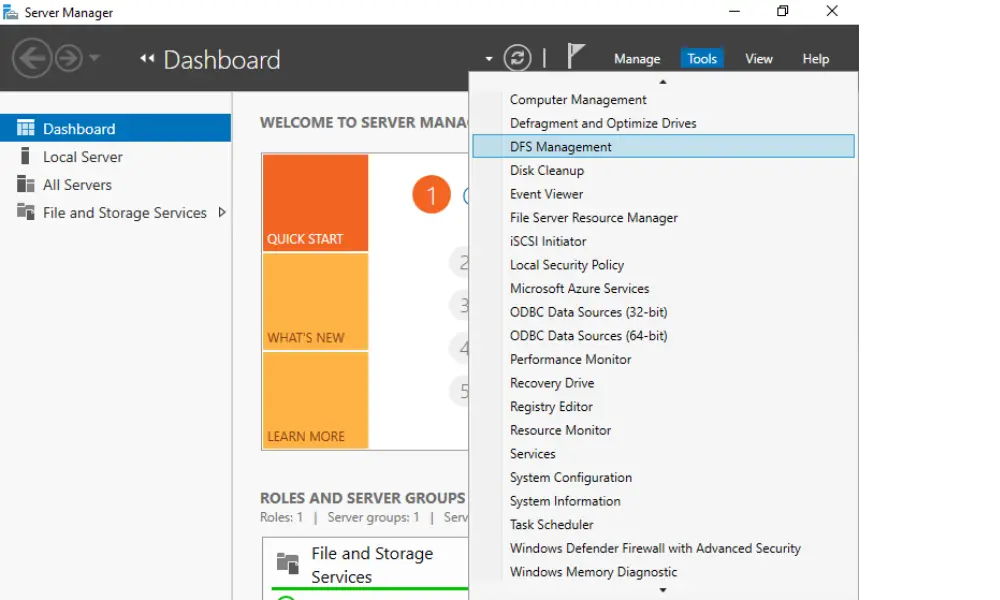
1. Launch DFS Management Console:
On your server, open the DFS Management console from the Server Manager or by searching for it in the start menu.
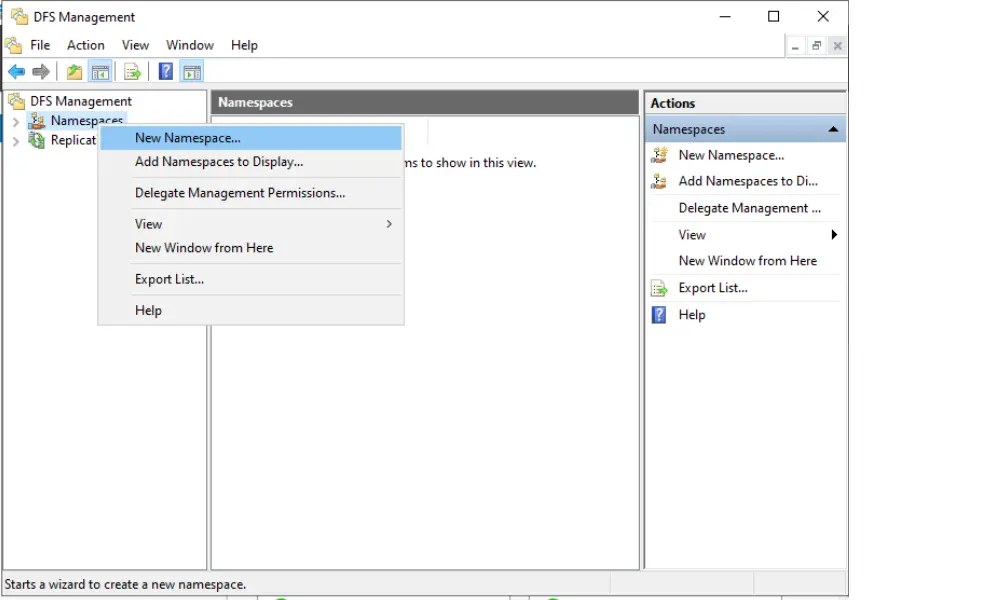
2. Create New Namespace
In the DFS console, right-click on ‘Namespaces’ and select ‘New Namespace’ to launch the New Namespace Wizard.
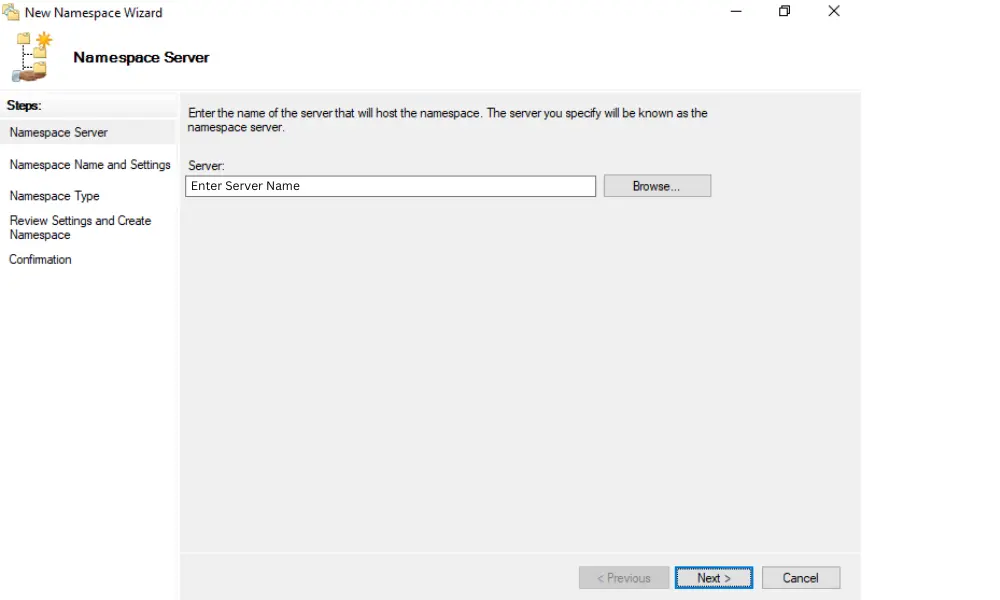
3. Enter the Namespace Server
Provide the name of the server that will host the namespace. This server should be a domain controller or a member server.
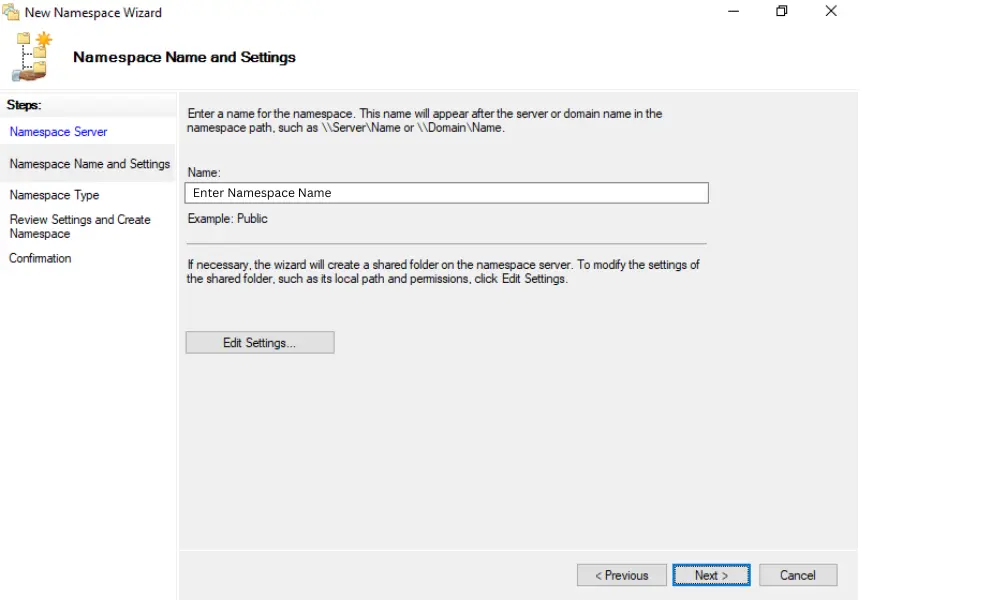
4. Define the Namespace
Enter a name for the namespace that adheres to your naming conventions.
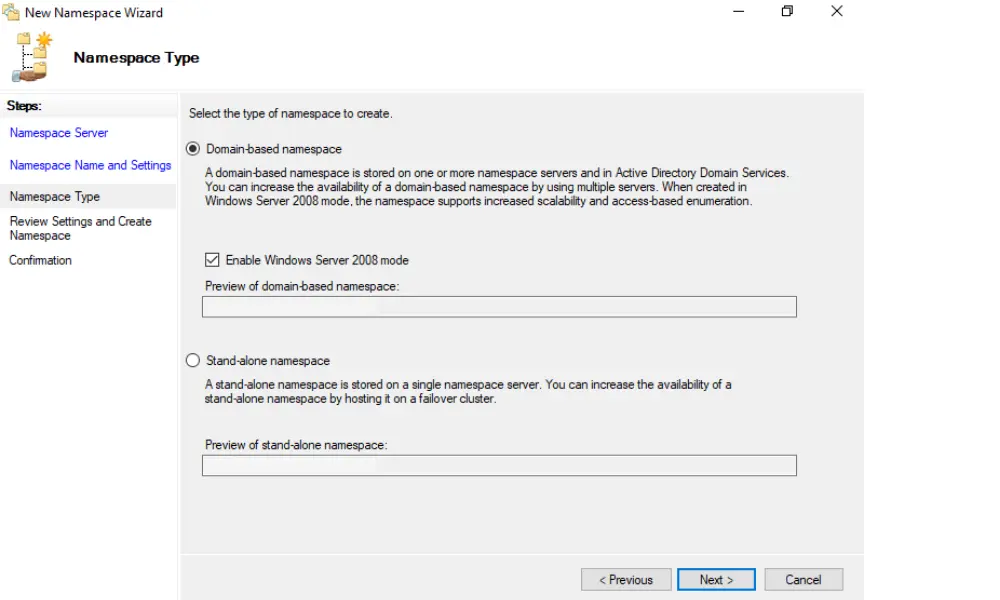
5. Namespace Settings
Choose the domain-based namespace option and set the desired settings. Enable Windows Server 2008 mode for additional features like access-based enumeration and increased scalability.
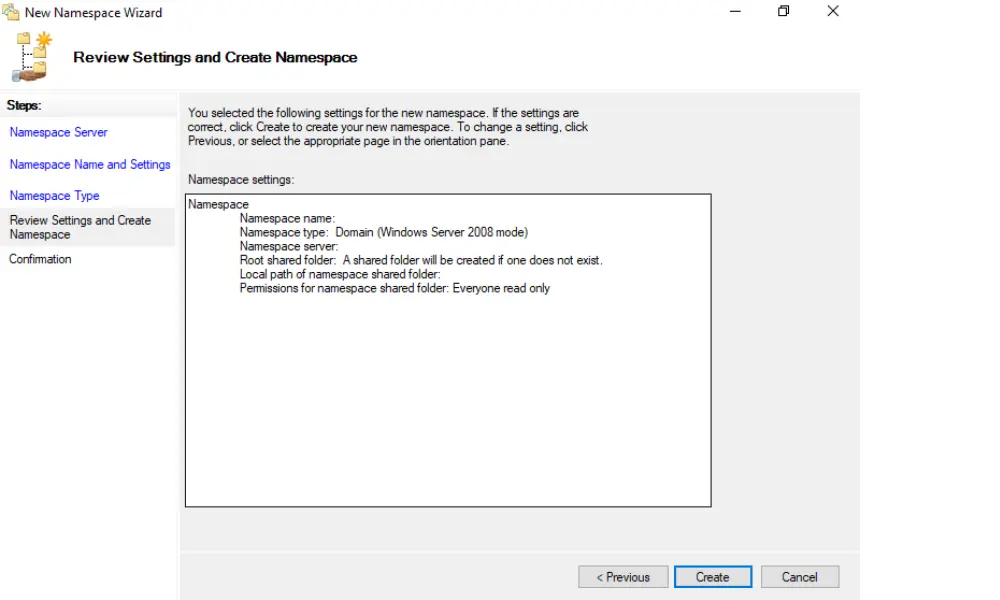
6. Review and Create
Review your settings and click ‘Create’ to deploy your new namespace.
7. Confirmation of Successful DFS Namespace Creation
Once you have successfully created DFS Namespace, proceed by clicking the [Close] button.

Configuring Namespace Properties and Permissions
After creating the namespace, you need to configure its properties and permissions:
- Configure Namespace Properties: Right-click on the namespace you created and select ‘Properties.’ Here, you can set various properties, such as enabling access-based enumeration, which allows users to see only the files and folders they have permission to access.
- Set Folder Targets: Add folder targets to your namespace by right-clicking on the namespace in the DFS Management console and selecting ‘New Folder.’ Provide a name for the folder and the path to the shared folder it should point to.
- Set up Permissions: Use the ‘Security’ tab in the properties of each namespace folder to configure NTFS permissions. Ensure that you grant permissions according to the principle of least privilege, providing users with only the access levels they need to perform their jobs.
- Replication (Optional): If you want to replicate the folder targets, you can set up replication by creating a new replication group and adding the folder targets as replicated folders within the group.
Setting Up DFS Replication
Distributed file system replication is a key feature that allows for the synchronization of files across multiple servers, ensuring that the same data is available across different geographic locations. This process is crucial for businesses that require high availability and consistency of data.
Overview of the DFS Replication Process
DFS Replication uses a multi-master replication model, which means that any member of the replication group can receive updates and replicate those changes to other members of the group. This model is efficient and reliable, ensuring that if one server goes down, the others can continue to provide access to the shared data. The replication is based on the Remote Differential Compression (RDC) protocol, which transfers only the changed portions of files, reducing the amount of data sent across the network and improving replication efficiency.
Creating a Replication Group
To set up DFS Replication, you first need to create a replication group, which is a collection of file servers that will synchronize data among themselves. Here’s how to create one:
1. Open DFS Management:
Launch the DFS Management console from the Server Manager or by searching for it in the start menu.

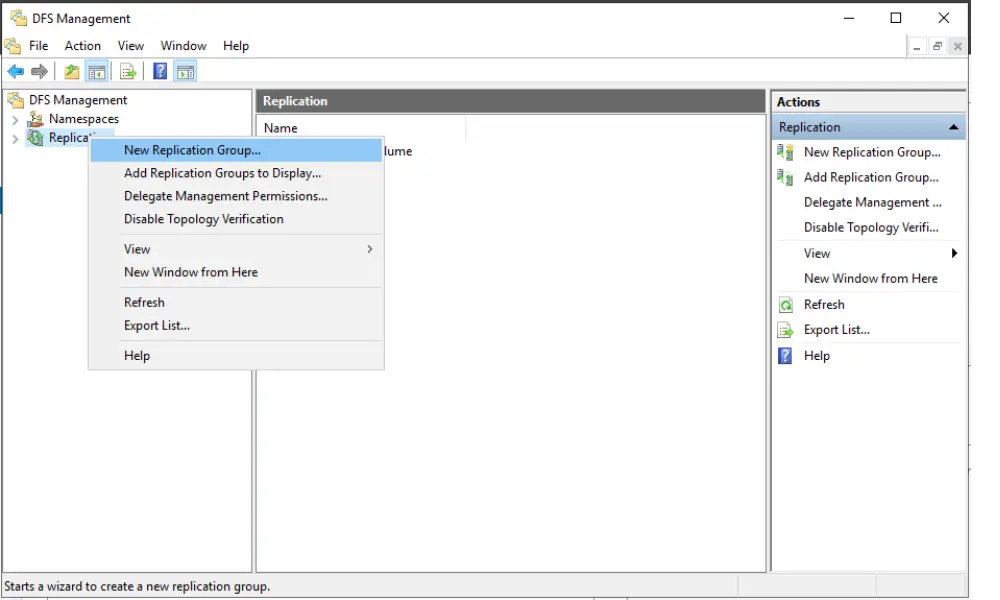
2. Create a New Replication Group
Right-click on ‘Replication’ and select ‘New Replication Group’ to start the New Replication Group Wizard.
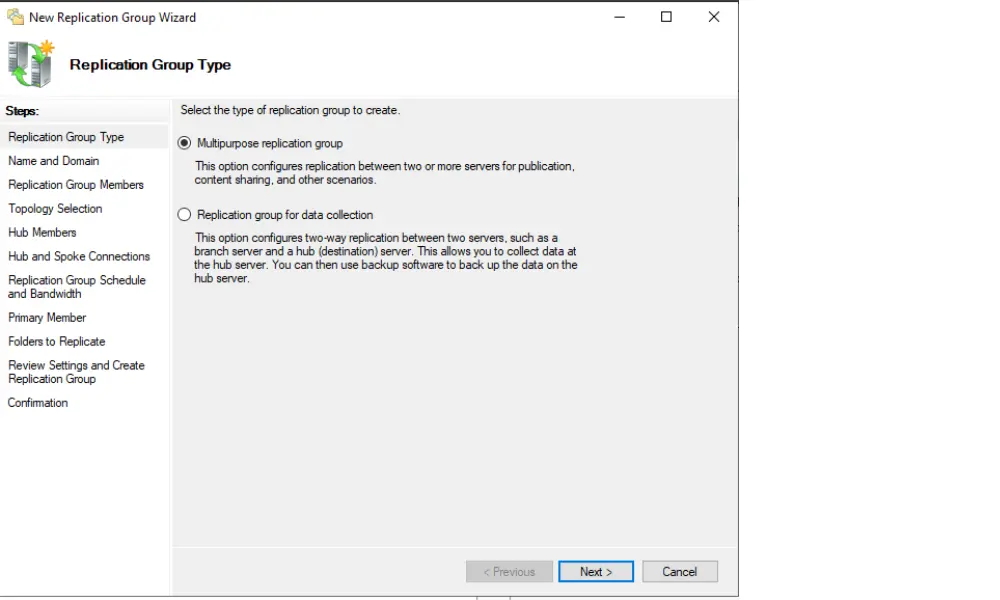
3. Select Group Type
Choose the ‘Multi-purpose replication group’ option for the most flexibility and enter a name for the group.
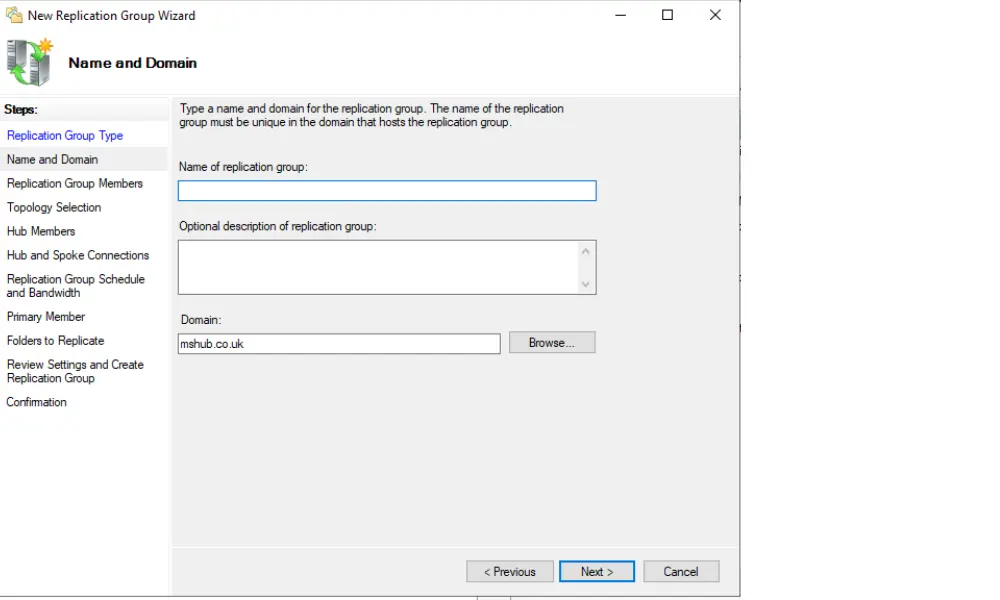
4. Name the Replication Group
Enter a name for the replication group that adheres to your naming conventions.
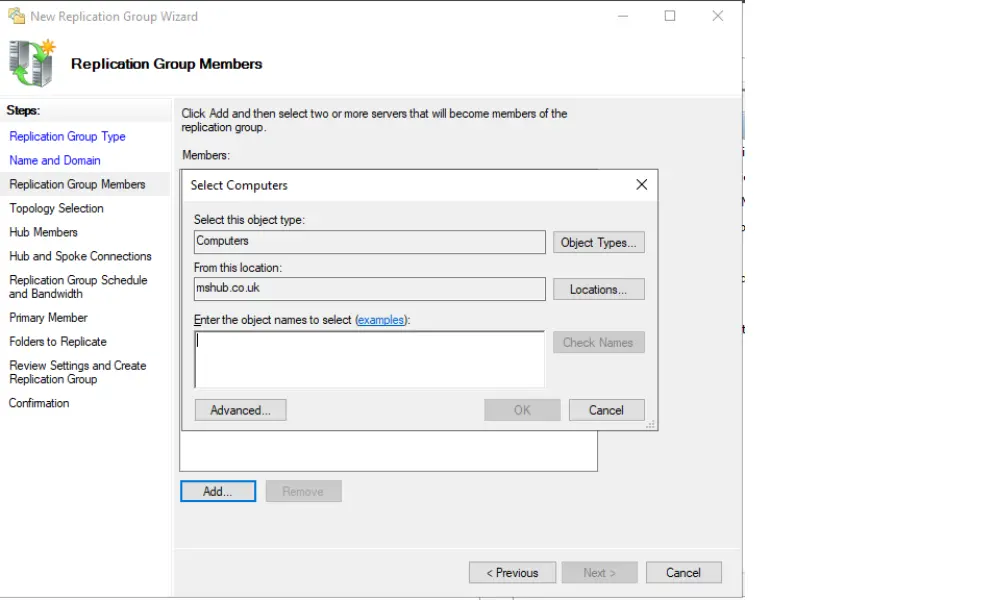
5. Add Replication Group Members
Add server names that will become members of the replication group.
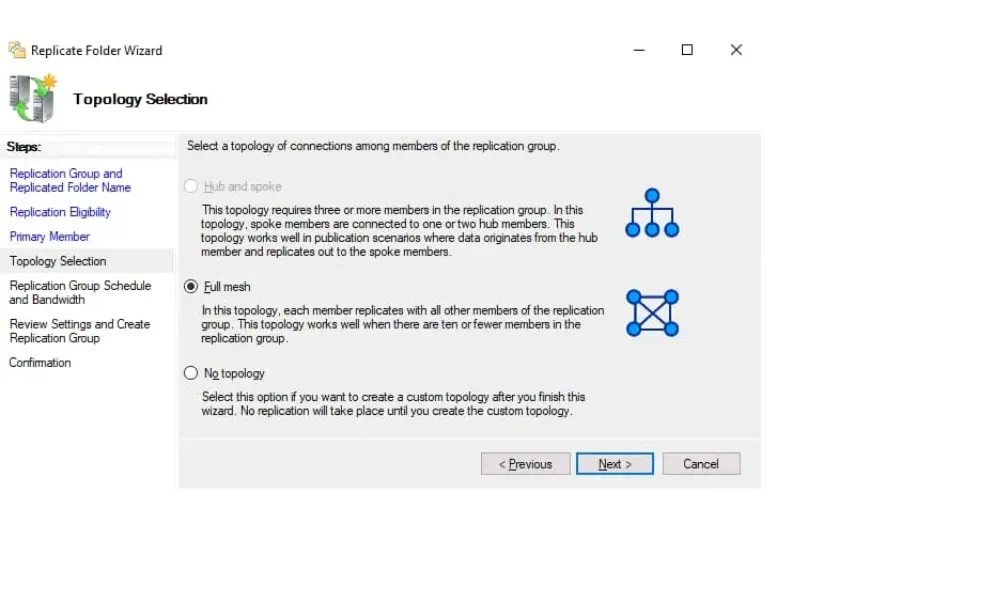
6. Configure Replication Topology
Decide on the topology for replicating data. You can choose from hub-and-spoke, full mesh, or a custom topology based on your network’s needs.
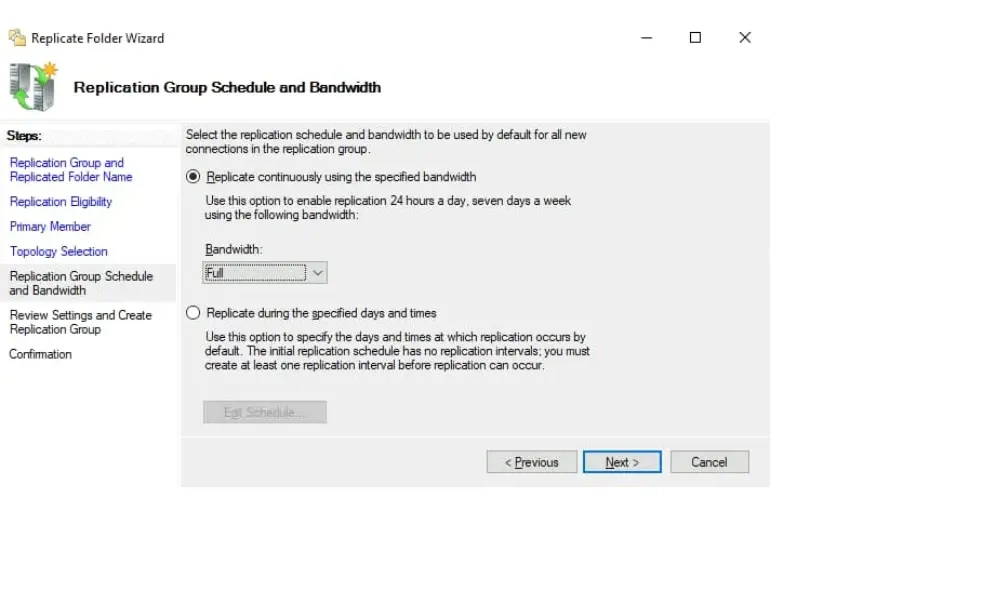
7. Replication Group Schedule and Bandwidth
Choose between “replicate continuously using the specific bandwidth” and “Replicate during specific days and times”
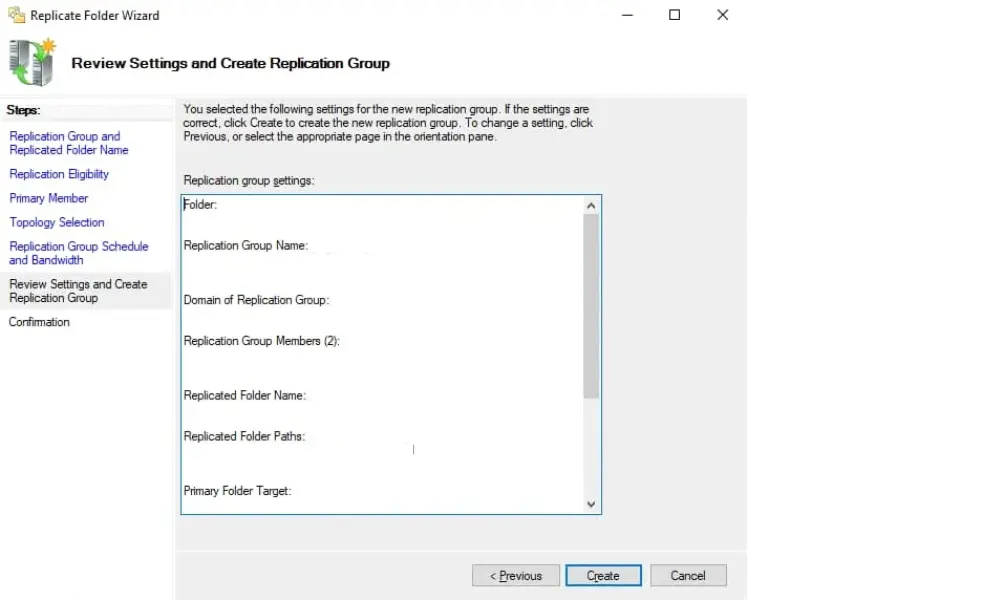
8. Review and Create Replication Group
Review all the settings for the replication group and the replicated folders. Once confirmed, finish the wizard to create the replication group.
Adding Folders to the Replication Group
After creating the replication group, you need to add the folders you wish to replicate: 2019
- Specify the Local Path of the Replicated Folder: For each member server, you’ll need to provide the path to the local folder that you want to replicate.
- Set Primary Member: Designate a primary member for the initial replication. This server will be the reference point from which all other members will replicate the data initially.
- Configure Folder Permissions: Ensure that the replicated folders have the correct NTFS permissions set to control access to the data.
- Scheduling and Bandwidth: Configure the replication schedule and bandwidth usage to optimize replication times and minimize impact on network performance.
- Review Settings and Finish: Review all the settings for the replication group and the replicated folders. Once confirmed, finish the wizard to create the replication group.
Setup DFS Share
Once you have set up DFS Replication, the next step is to configure a DFS Share, which is the process of sharing a folder on the network and integrating it with DFS. This allows for centralized management of shared folders and ensures that users have access to the data they need.
Sharing a Folder on the Network
Before a folder can be added to a DFS Namespace, it must be shared on the network. Follow these steps to share a folder:
- Choose or Create a Folder: Select an existing folder or create a new one that you want to share on the network. This folder will be the target for DFS.
- Share the Folder: Right-click on the folder and select ‘Properties.’ Navigate to the ‘Sharing’ tab and click on ‘Advanced Sharing.’
- Advanced Sharing Settings: Check ‘Share this folder’ and assign a share name that network users will use to access the folder.
- Permissions: Click on ‘Permissions’ to set share permissions. It’s advisable to give ‘Change’ and ‘Read’ permissions for groups that need to modify files and ‘Read’ permission for groups that only need to view files.
- Apply and Close: After configuring the share permissions, click ‘Apply’ and then ‘OK’ to close the sharing dialogues.
Integrating Shared Folders with DFS
With the folder shared on the network, you can now integrate it into your DFS Namespace:
- Open DFS Management: Access the DFS Management console.
- Add Folder to Namespace: Navigate to the namespace where you want to add the shared folder. Right-click on the namespace and select ‘New Folder.’
- Enter Folder Details: Provide a name for the folder within the DFS Namespace. This name is what users will see and use to access the shared folder.
- Add Folder Target: In the ‘New Folder’ dialogue, click ‘Add’ to specify the folder target. Enter the path to the shared folder you created earlier.
- Finish: Click ‘OK’ to add the folder to the namespace. The shared folder is now part of the DFS Namespace and can be accessed using the DFS path.
Setting Permissions for DFS Shared Folders
Proper permissions are crucial to secure the data within the shared folders and to control access:
- NTFS Permissions: In addition to the share permissions, set NTFS permissions on the actual folder by right-clicking the folder, selecting ‘Properties,’ and navigating to the ‘Security’ tab.
- Access: Assign appropriate NTFS permissions based on user roles and responsibilities within your organization. This might include read, write, modify, or full control permissions.
- Access-Based Enumeration: Consider enabling Access-Based Enumeration (ABE) on the namespace to ensure that users only see the folders to which they have access.
- Propagation of Permissions: If you have a nested folder structure, ensure that permissions are properly propagated to subfolders and files as necessary.
- Testing: After setting permissions, test access with user accounts with different permission levels to ensure access controls work as intended.
Managing DFS Replication Group Settings
Effective management of DFS Replication group settings is essential to ensure that the replication process aligns with organizational requirements and network capacity. This includes configuring replication schedules, adjusting bandwidth, and selecting an appropriate replication topology, as well as monitoring the health and performance of replication.
Configuring Replication Schedule
The replication schedule determines when data replication occurs and can be configured to minimize the impact on network resources during peak hours:
- Access Replication Group Settings: In the DFS Management console, right-click the replication group and select ‘Properties.’
- Schedule Tab: Navigate to the ‘Schedule’ tab where you can configure the availability of replication. You can set a full schedule or a more granular one based on specific hours and days.
- Bandwidth Throttling: Within the schedule settings, you can also throttle the bandwidth used for replication. This is useful for controlling network traffic during business hours to ensure that replication does not interfere with other network operations.
Adjusting Bandwidth and Replication Topology
Bandwidth and topology settings are critical for managing how data is replicated across the network and ensuring efficient use of resources:
- Bandwidth Allocation: Allocate bandwidth for DFS Replication by considering the total available bandwidth and the importance of replication traffic relative to other network activities.
- Topology Configuration: Choose a replication topology that suits your network’s design and replication needs. Options include a full mesh topology, ideal for environments where any server can replicate to any other server, and a hub-and-spoke topology, which centralizes replication through a hub server.
Monitoring Replication Health and Performance
Regular monitoring of DFS Replication is necessary to identify and resolve issues promptly:
- Health Reports: Generate health reports for replication groups by using the ‘Diagnostics’ section in the DFS Management console. These reports provide insights into the current state of replication and identify any potential issues.
- Performance Counters: Use performance counters in Windows Performance Monitor to track the performance of DFS Replication. Look for counters related to DFS Replication to assess the latency, backlog, and transactional success of replication activities.
- Event Logs: Check the DFS Replication event logs for warnings or errors that could indicate problems with replication. The event logs can be accessed through the Event Viewer and provide detailed information about replication events.
- Real-time Monitoring: For real-time monitoring, use the ‘Replication’ tab in the DFS console to view the status of replication folders, including the size of the replication queue and the rate of replication.
Advanced DFS Namespace and Replication Features
DFS Replication offers a suite of advanced features that can optimize and refine the replication process. These features include using replication filters, leveraging Remote Differential Compression (RDC), and managing conflict resolution and pre-seeding of data. Understanding and implementing these features can significantly enhance the efficiency and reliability of DFS.
Implementing Replication Filters
Replication filters allow you to include or exclude certain files and file types from replication. This can help in conserving bandwidth and ensuring that only relevant data is replicated:
- Setting Up Filters: To implement filters, access the properties of the replication group and navigate to the ‘Replicated Folders’ tab. Select a folder and click ‘Edit’ to modify its properties.
- Exclude and Include Files: In the ‘Filter’ tab of the replicated folder properties, you can specify file extensions to exclude from replication. For example, you might exclude temporary files by adding an exclusion for
*.tmpfiles.
Using Remote Differential Compression
RDC is a key feature of DFS Replication that optimizes the replication of file changes across the network:
- Understanding RDC: RDC detects changes to the data within files and replicates only the changed file blocks instead of the entire file. This is particularly beneficial for large files where changes are relatively small.
- Configuring RDC: RDC is enabled by default for DFS Replication, but you can adjust its settings. In the ‘Replicated Folders’ properties, under the ‘Advanced’ tab, you can configure the RDC settings to fine-tune performance based on the types of files being replicated and the available bandwidth.
Handling Conflict Resolution
In a multi-master replication model, conflicts can occur when the same file is modified on different servers between replication intervals. DFS Replication handles this by:
- Conflict and Deleted Items: Using a ‘Conflict and Deleted’ folder to store the pre-conflict versions of files. This ensures that no data is lost during conflict resolution.
- Automatic Resolution: DFS Replication automatically resolves conflicts by keeping the latest version of the file and moving the older versions to the ‘Conflict and Deleted’ folder.
- Customizing Conflict Policies: You can customize how conflicts are handled by setting policies within the ‘Replicated Folders’ settings. This includes specifying the retention period for files in the ‘Conflict and Deleted’ folder.
Pre-seeding Data
Pre-seeding is the process of manually copying data to replication partners before the initial synchronization. This can greatly reduce the time and bandwidth required for the initial replication:
- Manual Copy: Before setting up a new replication group, copy the data to all group members manually or by using other synchronization methods.
- Robocopy or Backup Restore: Use tools like Robocopy or restore from backup to pre-seed data. Ensure that the file attributes and timestamps are preserved during the copy.
- Initial Synchronization: When DFS Replication performs the initial synchronization, it will detect the pre-seeded data and only replicate the differences, which speeds up the process and reduces network load.
By utilizing these advanced features, administrators can ensure that DFS is tailored to a specific environment, providing a more controlled and efficient replication process. These optimizations can lead to better use of network resources, faster replication times, and improved overall performance of the DFS infrastructure.
Best Practices for DFS Replication and DFS Share
When implementing and managing DFS Replication and DFS Shares, adhering to best practices is crucial for maintaining security, optimizing performance, and ensuring data integrity. Here’s a guide to the best practices you should follow.
Security Best Practices
Security is paramount when setting up DFS Replication and Shares. Here are some security best practices:
- Use Strong ACLs: Implement strong Access Control Lists (ACLs) for both NTFS and share permissions to ensure that only authorized users can access the data.
- Least Privilege Principle: Grant users the minimum level of access necessary for their role. This minimizes the risk of unauthorized access or changes to files.
- Secure Replication Topology: Use a secure replication topology that reflects your organization’s structure and minimizes the risk of data interception or leakage.
- Encrypt Sensitive Data: If you are replicating sensitive data, consider using encryption methods, such as IPSec, to protect data in transit.
- Regularly Update Systems: Keep your Windows Server systems updated with the latest security patches to protect against vulnerabilities.
Performance Optimization Tips
To ensure DFS Replication performs optimally, consider the following tips:
- Optimize Schedules: Schedule replication during off-peak hours to reduce the impact on network performance.
- Bandwidth Throttling: Use bandwidth throttling to limit the amount of network bandwidth replication can consume.
- Staging Quota Size: Adjust the staging area quota to be large enough to handle the largest files being replicated to prevent replication failures.
- Use RDC Wisely: Remote Differential Compression (RDC) should be used judiciously, especially if the replication involves many small files, where the overhead might not be justified.
- Pre-seed Data: Pre-seed large files on new replication partners to minimize the initial sync time and bandwidth usage.
Regular Maintenance and Monitoring
Maintaining and monitoring your DFS setup is key to its long-term stability and efficiency:
- Monitor Replication Health: Regularly check the health of replication using the DFS Management console and generate health reports to identify any issues.
- Review Event Logs: Keep an eye on DFS Replication event logs for errors or warnings that need to be addressed.
- Plan for Capacity: Monitor storage trends and plan for capacity accordingly. Ensure that there is always enough free space on the servers to handle the replicated data.
- Regularly Test Failover: Periodically test failover to backup DFS servers to ensure high availability in case of server failure.
- Keep Documentation Updated: Maintain up-to-date documentation of your DFS infrastructure, including namespace structure, replication topology, and server roles.
Troubleshooting Common DFS Issues In Windows Environment
DFS is a robust and reliable service, but like any complex system, issues can arise. Knowing how to diagnose and resolve common replication errors, recover from failures, and utilize the right tools is essential for maintaining a healthy DFS environment.
Diagnosing and Resolving Common Replication Errors
When faced with replication issues, start with the following steps:
- Check Replication Health Reports: Use the DFS Management console to generate health reports for replication groups. These reports can identify common issues such as replication backlogs, file conflicts, and other errors.
- Verify Replication Topology: Ensure that the replication topology is correctly configured and that all servers can communicate with each other.
- Inspect Event Logs: Look at the DFS Replication event logs in the Event Viewer for any warning or error messages. These logs can provide specific error codes and descriptions that are useful for troubleshooting.
- Ensure Adequate Staging Area Quota: A common cause of replication errors is an inadequate staging area quota. Increase the quota to accommodate the size of the files being replicated.
- Resolve File Conflicts: Check for file conflicts in the ‘Conflicts and Deleted’ folder and resolve them by determining which version of the file should be kept.
Recovering from DFS Replication Failures
If DFS Replication fails, follow these steps to recover:
- Identify the Failure Point: Determine which part of the file replication process fails. Is it a server issue, a network problem, or a configuration error?
- Restart DFS Services: Sometimes, simply restarting DFS file replication services on the affected server can resolve transient issues.
- Reinitialize Replication: If there is a persistent issue with a replication group, consider reinitializing replication for that group. This can be done by removing and re-adding the replication group or using the ‘dfsrdiag syncnow’ command.
- Restore from Backup: If replication issues have led to data loss or corruption, restore the affected files from the backup.
Tools and Resources for Troubleshooting
Several tools and resources can aid in troubleshooting DFS issues:
- DFS Management Console: The primary tool for managing DFS Replication and Namespaces, which includes features for creating reports and monitoring the replication state.
- Dfsrdiag: A command-line tool that provides information about DFS Replication and can be used to force immediate replication, poll for replication status, and more.
- Robocopy: Useful for pre-seeding data in replication folders and for verifying the integrity of replicated data.
- Windows Server Performance Monitor: Monitor the performance of DFS Replication by using specific DFS Replication counters.
- Microsoft Support: For unresolved issues, Microsoft Support can assist. The knowledge base articles and forums are also valuable resources for finding solutions to common problems.
Conclusion
DFS environment can significantly impact business operations, offering improved data redundancy, disaster recovery capabilities, and seamless user access to shared files. Implementing DFS on a Windows server with best practices in mind enhances security, optimizes performance, and ensures a robust setup. For further insights and guidance on maximizing the potential of Active Directory and DFS, explore additional articles on Active Directory to stay informed and maintain a competitive edge in evolving technology.