
Windows Server Core Initial Setup
Windows Server Core is a minimalistic installation of the Windows Server operating system. Unlike the full installation of Windows Server, it does not install a graphical user interface (GUI). This makes it ideal for use in server environments where a GUI is unnecessary.
Server Core is the default installation option for Server 2016 and Server 2019. Microsoft recommends using server core for all standard server installs; desktop experience to be used in exceptional use cases. This article will go through Windows server core initial setup and some benefits of using server core
The Benefits of Windows Server Core
Windows Server Core is a reduced-footprint version of Windows Server that delivers improved security and reliability. By reducing the number of installed components, Windows Server Core provides a smaller attack surface for malicious actors to exploit. Additionally, the reduced number of components results in improved application security and fewer attack opportunities. In addition to enhancing security,
Windows Server Core reduces maintenance and management overhead. By eliminating unneeded features and functionality, Windows Server Core requires less patching and updating. As a result, organizations can save time and money by running their servers on Windows Server Core.
Perform Windows Server Core Initial Setup
When we select the Windows Server Core installation option, we get a stripped-down operating system version. There is no Taskbar, Explorer shell, Server Manager, Microsoft Management Console, and virtually no other graphical applications. However, the advantages of running servers using the Server Core option are several.
Once the server core is configured, we can connect and manage the server core remotely using remote management utilities like Server Manager and MMC snap-ins. Still, immediately after the installation, we have to perform some basic post-installation tasks interactively, such as configuring the network adaptor, renaming the computer and joining the server to a domain.
This article will go through different ways we can perform these post-installation tasks. In brief, we can perform all these tasks using one of three methods.
- Sconfig utility
- PowerShell
- Command line
Windows Server Core initial Setup using Sconfig utility
Let’s start with our favourite sconfig utility; this utility can be used to perform post-configuration tasks with ease. We can access this utility by typing sconfig from the administrative command prompt. Let’s check sconfig utility options individually to see how we can set up the server core using the sconfig utility.
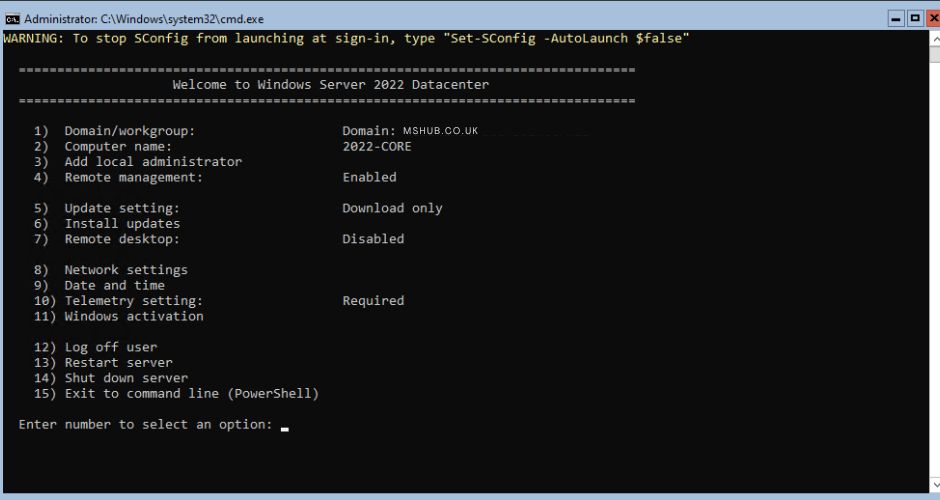
- Domain/Workgroup – When we install a Workstation or a Server OS, the machine is part of the Workgroup. By selecting option 1 we can join the server to an Active Directory environment. Note: Rename the server by selecting option 2 first before joining the server to the active directory environment.
- Computer Name – Changing the server name must be one of the first setup tasks before adding the server to the active directory environment. Having a constant and meaningful server naming convention will help the IT team quickly figure out the server’s role and other information about the server just from its name
- Add Local Administrator – There are a few reasons you might want to add a local administrator to a server. One reason is that you need to give someone temporary access to administer the server. Another reason is if you have a service or application that needs to run under a specific account with administrator privileges.
- Remote Management is unlike Remote Desktop, it is a different service in Windows Server machines related to WinRM Service. You can manage your server remotely using RSAT tools when remote Management is enabled. There are 4 options available under remote Management 1. Enable remote Management; 2. Disable remote management 3. Configure server response to pings 4. Return to the main menu.
- Windows Update Settings This option lets us configure Servers update settings which can be Automatic download only or manual.
- Install Updates By choosing this option, we will trigger the server to check and download updates. There are two options Download All updates or Recommended updates.
- Remote Desktop We can enable or disable RDP access to the server from here.
- Network Settings By selecting this option, we can configure Windows Network Interface settings, such as IP address, Subnet Mask, Default Gateway, and DNS Settings
- Date and Time This menu lets us easily configure the date and time.
- Telemetry Settings We can choose between Security, Basic, Enhanced and Full to help Windows Server improve its performance by collecting statistical information about our server.
- Windows Activation By using this menu, we can easily display license info and activate windows and install product key
Windows Server Core initial Setup using PowerShell
This section will go through how to perform the initial setup for Windows Server Core using PowerShell.
Set a Static IP address
When we install a desktop or server operating system, it has a default network setup to use a DHCP address. We can set a static IP address using the following steps if we need a static IP address.
To set a static IP address, view your current network configuration using below PowerShell Cmdlet#
#View current Network Configuration
Get-NetIPConfiguration
#
Note the number in the IfIndex column for your IP interface or the InterfaceDescription string. If you have more than one network adapter, note the number or string corresponding to the interface you want to set the static IP address for.
Run the following PowerShell cmdlet to set the static IP address:
#Set Static IP Address
#Change the InterfaceIndex value to match your Interface Index number
New-NetIPaddress -InterfaceIndex 6 -IPAddress 192.168.0.100 -PrefixLength 24 -DefaultGateway 192.168.0.1
#
Run the following cmdlet to set the DNS client server address:
#Set DNS Address
#Change the InterfaceIndex value to match your Interface Index number
Set-DNSClientServerAddress –InterfaceIndex 6 -ServerAddresses 92.168.0.1,192.168.0.2
#
If you ever want to switch back to using DHCP, run the below PowerShell cmdlet with the correct InterfaceIndex number of your network adaptor
#Switch back to user DHCP
#Change the InterfaceIndex value to match your Interface Index number
Set-DnsClientServerAddress –InterfaceIndex 6 –ResetServerAddresses
#
Rename the computer and join it to the domain using PowerShell
The server is assigned a random name during the build. Let’s rename the computer and add it to the domain using the single PowerShell command.
#Rename Computer and add it to Active Directory Domain
Add-Computer -DomainName YourDomainName -NewName NewServerNAme -Credential YourDomainName\administrator
#
Enable Windows PowerShell Remoting
Windows PowerShell remoting is a feature that enables us to run PowerShell commands on remote computers. As the server core doesn’t have any graphical interface, we can enable PowerShell remoting and manage the server core using remote management tools.
#Enable PowerShell remoting
Enable-PSRemoting
#
Manage Server Core Using Remote Management Tools
A server core doesn’t include a graphical user interface (GUI). This can make managing a server core seem daunting initially, but plenty of tools are available to make the task easier.
Windows Admin Centre is the most popular tool to manage a server core locally and remotely. This tool provides a web-based GUI that can be used to manage various aspects of the server. Another tool that can be used to manage a server core is Remote Server Administration Tools (RSAT).
RSAT is a Microsoft package with various tools for remotely managing Windows servers. It can be installed on any computer, including those running Windows 10. PowerShell can also be used to manage a server core both locally and remotely.
List of remote management tools that can be used to manage server core
- Windows Admin Centre
- Remote Server Administration Tools running on Windows 10
- Windows PowerShell Remoting
- Remotely using Server Manager
- Remotely using an MMC snap-in
In conclusion, setting up Windows Server Core is relatively simple and only requires a few steps. Once completed, you will have a fully functioning server ready to be configured for your specific needs. With its small footprint and minimalistic approach, Windows Server Core is an ideal choice for many organizations.