
Migrate Azure AD Connect To New Server
Azure AD Connect is a tool that connects the on-premises active directory with the Azure Active Directory. AAD Connect entitles single sign-on capabilities as well as synchronization of data between the two systems. In this article, we’ll run through the process of migrating Azure AD Connect from one server to another, step by step. We’ll also discuss the prerequisites for the New AD Connect Server, common issues you may encounter during the migration process, and how to resolve them.
There are a few reasons you might want to migrate Azure AD Connect to a new server:
- Your current AD Connect Server is running Windows Server 2012 and Windows Server 2012 R2, which is no longer supported for Azure AD Connect v2
- You want to take advantage of the new features in Azure AD Connect v2
- Azure AD Connect had SQL Server 2012 LocalDB in past versions, but Azure AD Connect v2 comes with SQL Server 2019 LocalDB. Microsoft has enhanced performance and stability in the V2 release by implementing several security-related bug fixes in SQL Server 2019.
This article outlines the step-by-step process to migrate Azure AD Connect to a new Server using Azure AD Sync Staging Mode:
- Prerequisites for New AD Connect Server.
- Export the configuration from the old server.
- Install Azure AD Connect on the new server and import the configuration.
- Migrate Azure AD Connect by performing a cutover to the New Server
Follow this Azure AD Connect Migration guide, and you’ll be up and running on your new server in no time!
Prerequisites for New AD Connect Server
This section will outline the prerequisites and pre-installation procedure for an Azure AD Connect installation and migration. These steps will ensure a smooth migration of Azure AD Connect to a new server.
TLS 1.2 Is Required For Azure AD Connect V2.0
Azure AD Connect V2.0 requires TLS 1.2; If TLS 1.2 is not enabled on your server, you will need to enable this before you can deploy Azure AD Connect V2.0.
PowerShell Script To Check TLS 1.2
You can use the following PowerShell script to check the current TLS 1.2 settings on your Azure AD Connect server.
#PowerShell script to check TLS 1.2
Function Get-ADSyncToolsTls12RegValue
{
    [CmdletBinding()]
    Param
    (
        # Registry Path
        [Parameter(Mandatory=$true,
                   Position=0)]
        [string]
        $RegPath,

        # Registry Name
        [Parameter(Mandatory=$true,
                   Position=1)]
        [string]
        $RegName
    )
    $regItem = Get-ItemProperty -Path $RegPath -Name $RegName -ErrorAction Ignore
    $output = "" | select Path,Name,Value
    $output.Path = $RegPath
    $output.Name = $RegName

    If ($regItem -eq $null)
    {
        $output.Value = "Not Found"
    }
    Else
    {
        $output.Value = $regItem.$RegName
    }
    $output
}

$regSettings = @()
$regKey = 'HKLM:\SOFTWARE\WOW6432Node\Microsoft\.NETFramework\v4.0.30319'
$regSettings += Get-ADSyncToolsTls12RegValue $regKey 'SystemDefaultTlsVersions'
$regSettings += Get-ADSyncToolsTls12RegValue $regKey 'SchUseStrongCrypto'

$regKey = 'HKLM:\SOFTWARE\Microsoft\.NETFramework\v4.0.30319'
$regSettings += Get-ADSyncToolsTls12RegValue $regKey 'SystemDefaultTlsVersions'
$regSettings += Get-ADSyncToolsTls12RegValue $regKey 'SchUseStrongCrypto'

$regKey = 'HKLM:\SYSTEM\CurrentControlSet\Control\SecurityProviders\SCHANNEL\Protocols\TLS 1.2\Server'
$regSettings += Get-ADSyncToolsTls12RegValue $regKey 'Enabled'
$regSettings += Get-ADSyncToolsTls12RegValue $regKey 'DisabledByDefault'

$regKey = 'HKLM:\SYSTEM\CurrentControlSet\Control\SecurityProviders\SCHANNEL\Protocols\TLS 1.2\Client'
$regSettings += Get-ADSyncToolsTls12RegValue $regKey 'Enabled'
$regSettings += Get-ADSyncToolsTls12RegValue $regKey 'DisabledByDefault'

$regSettings
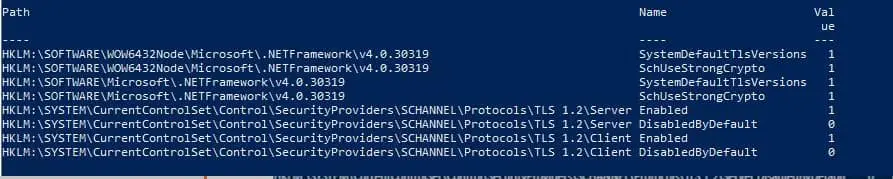
Example Output showing proper TLS1.2 configuration:
PowerShell Script To Enable TLS 1.2
You can use the following PowerShell script to enforce TLS 1.2 on your Azure AD Connect server.
#PowerShell script to enable TLS 1.2
If (-Not (Test-Path 'HKLM:\SOFTWARE\WOW6432Node\Microsoft\.NETFramework\v4.0.30319'))
{
    New-Item 'HKLM:\SOFTWARE\WOW6432Node\Microsoft\.NETFramework\v4.0.30319' -Force | Out-Null
}
New-ItemProperty -Path 'HKLM:\SOFTWARE\WOW6432Node\Microsoft\.NETFramework\v4.0.30319' -Name 'SystemDefaultTlsVersions' -Value '1' -PropertyType 'DWord' -Force | Out-Null
New-ItemProperty -Path 'HKLM:\SOFTWARE\WOW6432Node\Microsoft\.NETFramework\v4.0.30319' -Name 'SchUseStrongCrypto' -Value '1' -PropertyType 'DWord' -Force | Out-Null

If (-Not (Test-Path 'HKLM:\SOFTWARE\Microsoft\.NETFramework\v4.0.30319'))
{
    New-Item 'HKLM:\SOFTWARE\Microsoft\.NETFramework\v4.0.30319' -Force | Out-Null
}
New-ItemProperty -Path 'HKLM:\SOFTWARE\Microsoft\.NETFramework\v4.0.30319' -Name 'SystemDefaultTlsVersions' -Value '1' -PropertyType 'DWord' -Force | Out-Null
New-ItemProperty -Path 'HKLM:\SOFTWARE\Microsoft\.NETFramework\v4.0.30319' -Name 'SchUseStrongCrypto' -Value '1' -PropertyType 'DWord' -Force | Out-Null

If (-Not (Test-Path 'HKLM:\SYSTEM\CurrentControlSet\Control\SecurityProviders\SCHANNEL\Protocols\TLS 1.2\Server'))
{
    New-Item 'HKLM:\SYSTEM\CurrentControlSet\Control\SecurityProviders\SCHANNEL\Protocols\TLS 1.2\Server' -Force | Out-Null
}
New-ItemProperty -Path 'HKLM:\SYSTEM\CurrentControlSet\Control\SecurityProviders\SCHANNEL\Protocols\TLS 1.2\Server' -Name 'Enabled' -Value '1' -PropertyType 'DWord' -Force | Out-Null
New-ItemProperty -Path 'HKLM:\SYSTEM\CurrentControlSet\Control\SecurityProviders\SCHANNEL\Protocols\TLS 1.2\Server' -Name 'DisabledByDefault' -Value '0' -PropertyType 'DWord' -Force | Out-Null

If (-Not (Test-Path 'HKLM:\SYSTEM\CurrentControlSet\Control\SecurityProviders\SCHANNEL\Protocols\TLS 1.2\Client'))
{
    New-Item 'HKLM:\SYSTEM\CurrentControlSet\Control\SecurityProviders\SCHANNEL\Protocols\TLS 1.2\Client' -Force | Out-Null
}
New-ItemProperty -Path 'HKLM:\SYSTEM\CurrentControlSet\Control\SecurityProviders\SCHANNEL\Protocols\TLS 1.2\Client' -Name 'Enabled' -Value '1' -PropertyType 'DWord' -Force | Out-Null
New-ItemProperty -Path 'HKLM:\SYSTEM\CurrentControlSet\Control\SecurityProviders\SCHANNEL\Protocols\TLS 1.2\Client' -Name 'DisabledByDefault' -Value '0' -PropertyType 'DWord' -Force | Out-Null

Write-Host 'TLS 1.2 has been enabled. You must restart the Windows Server for the changes to take affect.' -ForegroundColor Cyan
PowerShell Version 5 is Required
Azure AD Connect depends on Microsoft PowerShell 5.0 and requires PowerShell version 5.0 or greater to be present on the server. You can use the following PowerShell cmdlet to check the PowerShell Version installed on your server
#Check PowerShell Version installed
$PSVersionTable
#
.NET Framework 4.5.1 or later is required
Azure AD Connect requires .NET Framework 4.5.1 or later to be installed on the server; you can use the below PowerShell command to check if 4.5.1 or later is installed on the server. This PowerShell script checks the value of the Release entry to determine whether .NET Framework 4.5.1 or later is installed. This code returns True if it’s installed and False otherwise.
#PowerShell Script to check if .NET Framework 4.5.1 or later is installed
#This code returns True if it's installed and False otherwise
(Get-ItemProperty "HKLM:\SOFTWARE\Microsoft\NET Framework Setup\NDP\v4\Full").Release -ge 378675
Ensuring All Azure Root and Subordinate Certificates are Installed
Make sure that all root and subordinate certificate authorities used by Azure are installed on the server. If any are missing, download the necessary certificates and add them to the trusted store. Refer to the Microsoft article at https://learn.microsoft.com/en-us/azure/security/fundamentals/azure-ca-details for specific details on the root and subordinate Certificate Authorities (CAs) employed by Azure.
Supported Operating Systems
Microsoft Azure Active Directory Connect Version 2 can be installed on a domain-joined, full GUI version of Windows Server 2022 or Windows Server 2019.
Migrating Azure AD Connect to a New Server
When migrating Azure AD Connect to a new server, it’s essential to thoroughly explore the current configuration to ensure a smooth transition. Begin by documenting the existing settings, including synchronization options, filtering configurations, and any customizations applied. This exploration phase helps identify potential pitfalls and ensures that the new server’s configuration mirrors the current setup accurately.
Once the current configuration is well-documented, the next step involves exporting this configuration data from the existing server. This export typically includes extracting synchronization rules, connector configurations, and any customizations made within Azure AD Connect.
After exporting the configuration, it can then be imported onto the new server, ensuring continuity of operations and minimal disruption to Azure AD synchronization processes. Let’s delve into each aspect of this migration process to ensure a seamless transition of Azure AD Connect services to the new server.
Export Ad Connect Configuration From the Old Server
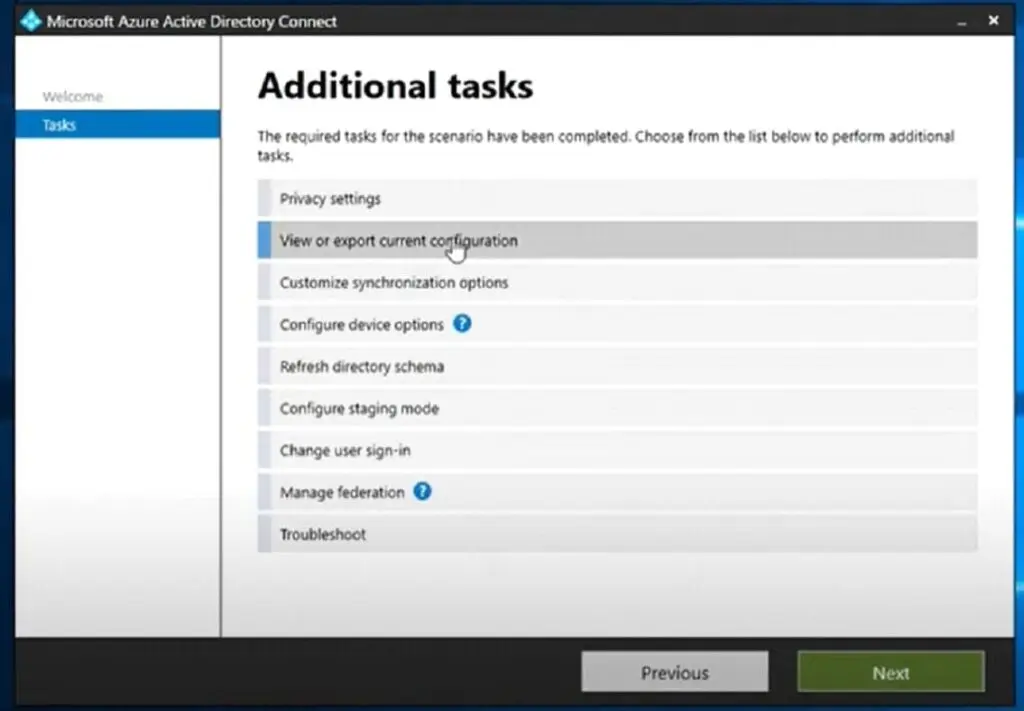
Exporting the existing Azure AD Connect configuration from the current server can be done by opening the Azure AD Connect console and selecting View or Export the current configuration.
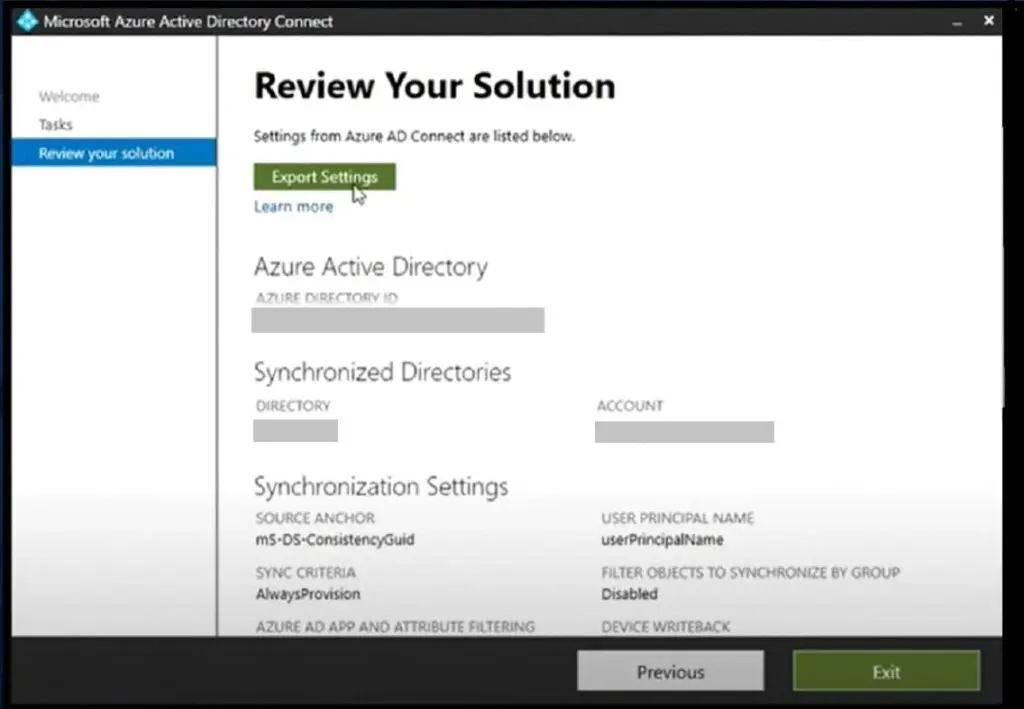
On Review your Solution Console, click on ‘Export Settings’ and select the location where you would export saved. Save it locally and then copy it to the new server
Install Azure AD Connect On The New Server And Import Configuration
In this subsection, we will guide you through the process of installing Azure AD Connect on your new server and seamlessly importing your existing configuration.
Download the latest version of AD Connect Installer
To download the latest version of the Azure AD Connect installer, go to the following Microsoft Download Center page – https://www.microsoft.com/en-us/download/details.aspx?id=47594
Install Azure AD Connect On The New Server In Staging Mode
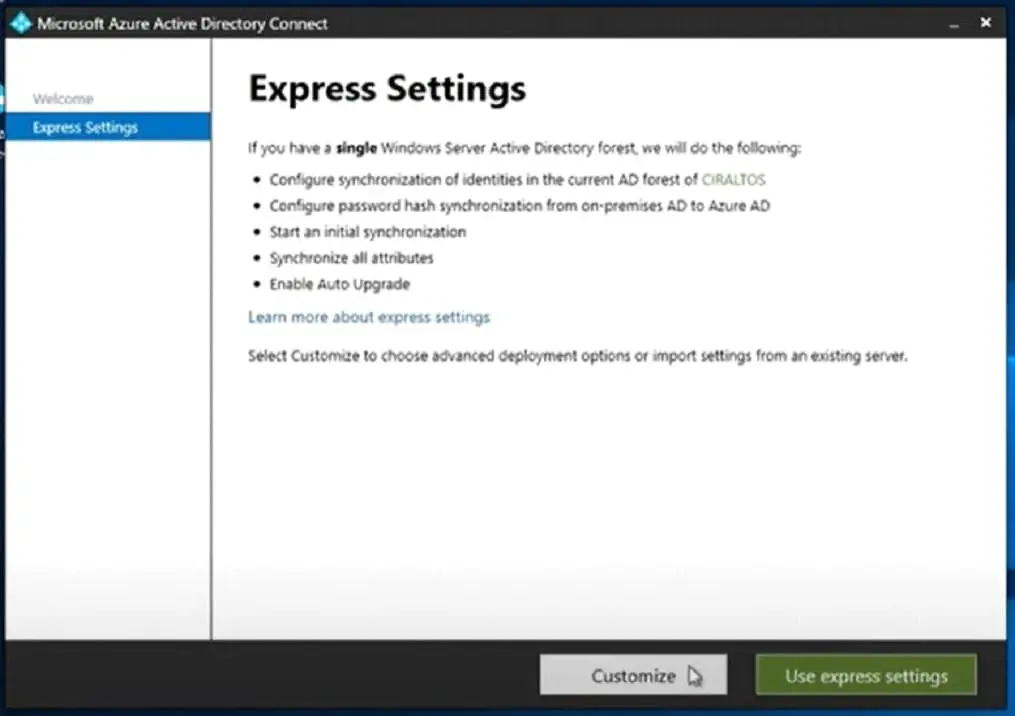
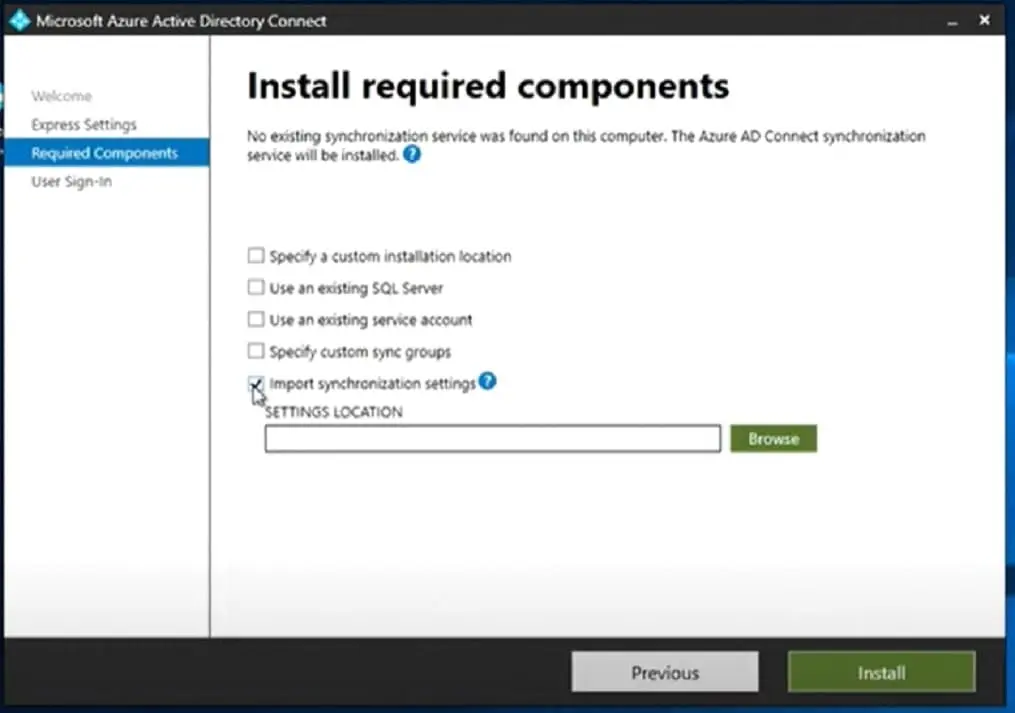
Copy the Azure AD Connect installer to the new server that will be hosting the latest version of the AAD Connect instance and launch it to begin the installation process. Use Express Setting – Select Customize. Select the option to import synchronisation settings, browse to the location where export settings were saved and select the file
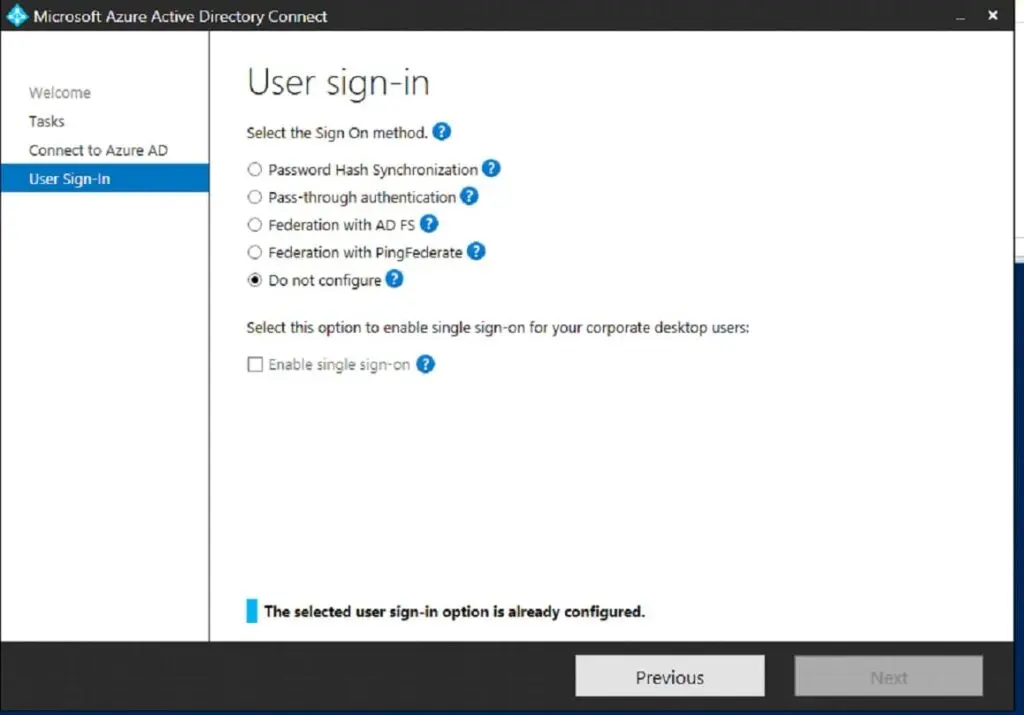
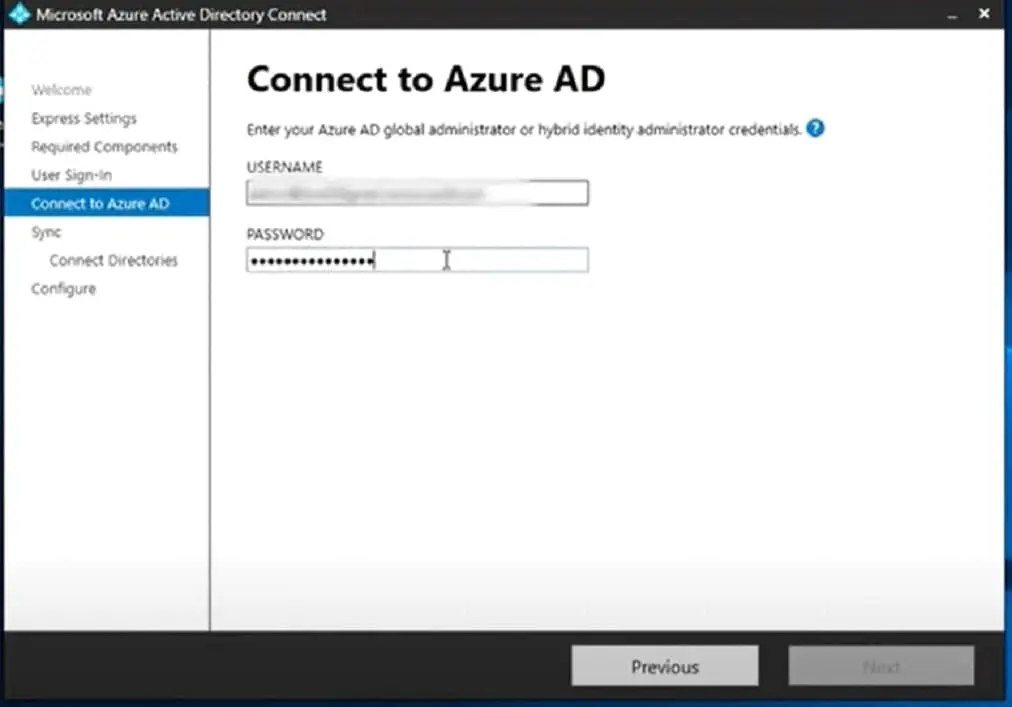
Select the appropriate user sign-in option & Connect to Azure AD using the Global Administrator’s login credentials
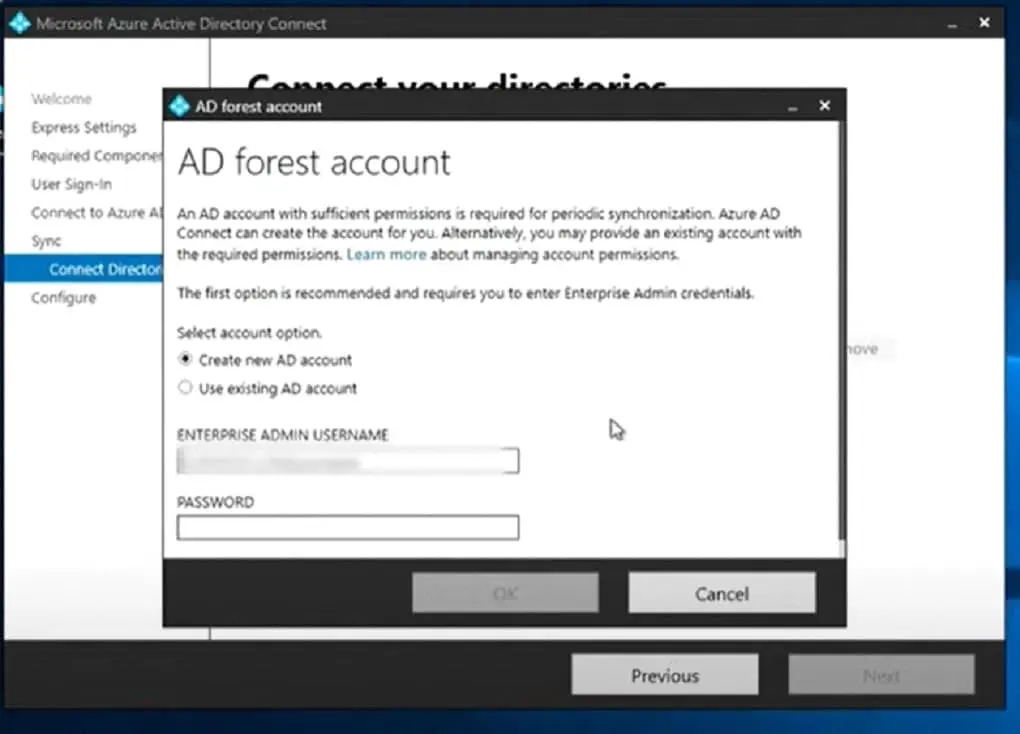
Select the first option “create new AD account” and enter the enterprise Admin account credentials & Check both boxes to start the synchronisation process when the configuration completes and to Enable staging mode. Select Install to begin the installation process
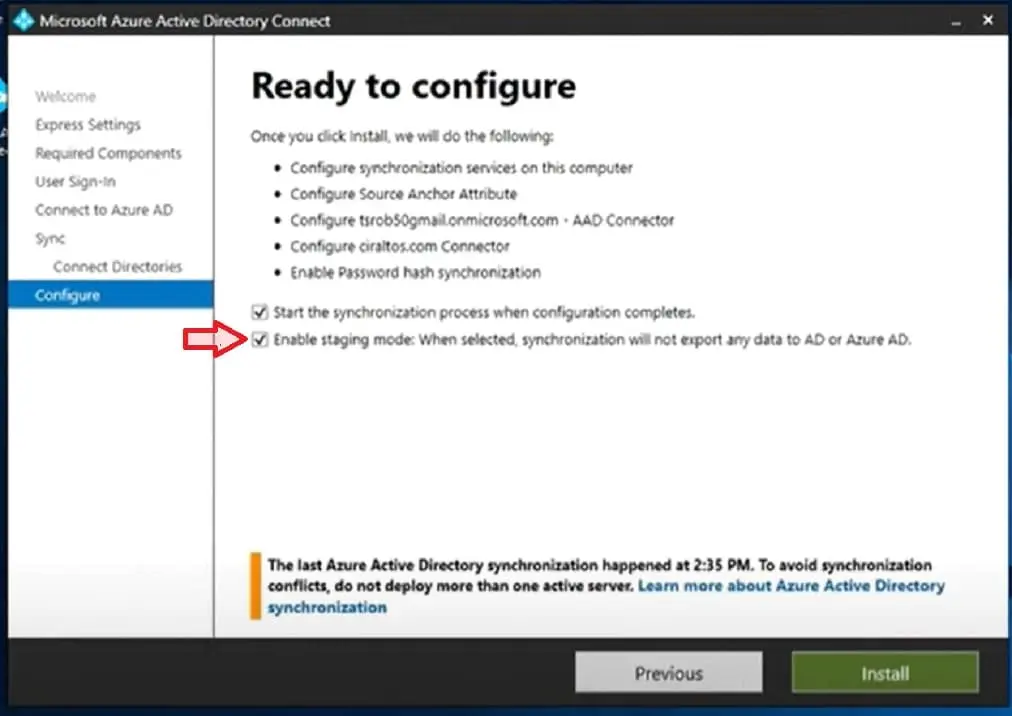
Configuration complete box is displayed once installation completes successfully!
Verify all settings have been imported successfully
Compare the old and new Server configurations to verify all settings have been imported successfully using AADConnectConfigDocumenter script. The AADConnectConfigDocumenter script can compare configurations from two different AADConnect instances and highlight any differences. This script can be downloaded from below GitHub repository – https://github.com/Microsoft/AADConnectConfigDocumenter
The GitHub repository has step-by-step instructions on how to use AADConnectConfigDocumenter script. This script will produce an HTML document highlighting any differences in configuration.
Migrate Azure AD Connect By Performing a Cutover To The New Server
Cutover to the new server is performed by enabling staging mode on the old server and then disabling stranging mode on the new server.
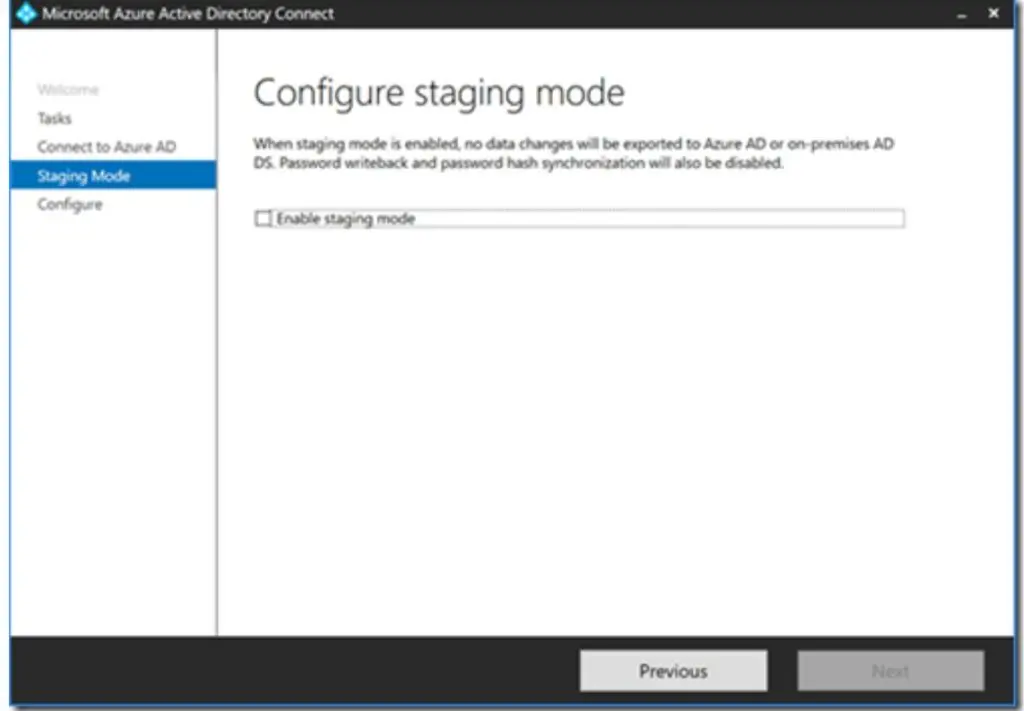
Place the Old Server In Staging Mode
To place the current production server (Old Server) in staging mode, launch the Microsoft Azure Active Directory Connect console on the old server and select “Configure Staging Mode.” Check the box to Enable Staging Mode. Both servers are currently in staging mode at this stage, and none are syncing changes to Azure AD.


Disable Staging Mode On The New Server
Launch the Microsoft Azure Active Directory Connect console on the new server and select “Configure Staging Mode”.
In the “configure staging mode” blade, uncheck the box “Enable Staging Mode.” At this stage, we have successfully performed the failover. The old server is in staging mode, and the new server will perform the sync to Azure AD.

In conclusion, following the Azure AD Connect Migration Guide is necessary when migrating to a new server. This guide provides the detailed steps required to migrate Azure AD Connect safely. Following these steps will ensure a smooth transition and avoid any issues.
